Today I’m sharing all about my experience with using Wallpop Peel and Stick floor tiles. And why I can’t recommend them to anyone.
After seeing so many good reviews on Instagram about these peel & stick tiles, I was hesitantly excited to try them in our fixer upper.
Normally I would never consider a faux, temporary home design solution like this, but I’m desperate to upgrade our poorly installed floor tile in our hall bathroom while we wait to get our foundation fixed.
My eyes can’t take these awful grout lines anymore (see below).

The Bathroom Floor of My Nightmares
I care a lot about the materials I incorporate into my home design. The more real materials you can use in your home, the better. I’ve seen the power of how textiles and materials can create a feeling of charm, elegance, and character in a home.
But home renovation is a luxury. Whether you hire out projects or DIY them, there’s always a cost involved. I believe you can make any house a home, on and budget, and I’m hoping these peel & stick tiles can give this room a cheap upgrade until we’re able to address the flooring down the road.
The existing tile in here is nice, but the installation is all wrong. The grout lines are huge and mismatched, stained, and the tile pattern is all over the place. As someone who loves to tile and cares about details like this, this room is hard for me to be in.
Enter: Wallpop Peel and Stick floor tiles.
What I Ordered
I ordered two options, one for each bathroom. The white hex tile in our old Texas house’s primary bathroom was one of my favorite features in the room (I even installed it myself). When I saw this hex tile peel & stick print I added it to cart immediately. For our hall bathroom, I picked a black and white modern style that I was curious to try.
Shipping from Wallpop.com was quick, although I never received a tracking code to follow up on my order.


My Experience With WallPop Floor Tiles
Con: Poor quality right out of the box.
Once they arrived, I opened up each box. The first thing I noticed was the finish was wearing off on several of the brand new tiles. They already looked worn! I immediately was disappointed by the quality. But after looking through all three boxes, I decided there were enough good tiles that I could try to hide the damaged parts where they wouldn’t be seen on the floor.


Con: Installation was so much harder than expected.
I estimated it would take about 40 minutes to install. Couldn’t be that hard, right? After all, I’ve tiled a shower and two bathroom floors by myself. This should be easy. My gosh, I was wrong. These peel and stick tiles took me four hours to install, start to finish.


Con: Difficult to get precise cuts.
These tiles were not easy to cut. Especially for curved angles like around the toilet. Maybe it was the tool I was using, but the tiles were difficult to cut into any shape besides a straight line. When installing real tile, you remove items like the toilet and vanity so you can install the flooring underneath them. But with peel and stick floor tile, you have to very precisely cut around those. I found precision, custom cuts like this to be almost impossible.

Con: Easy to expose the adhesiveness.
The paper backing made it difficult when I had to remake cuts to get measurements right. The paper peeled off, leaving the adhesive exposed and therefore less sticky when installed.
Con: Poor durability.
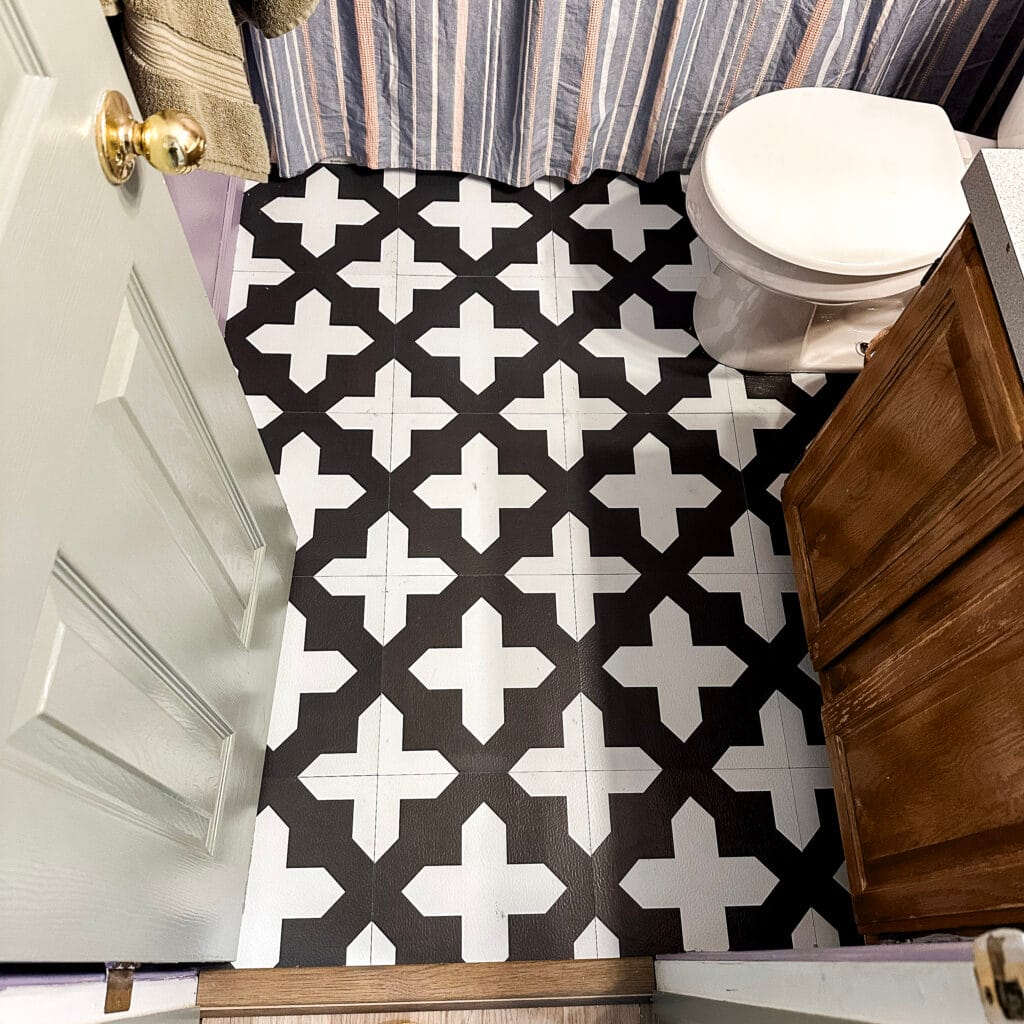
As continued to install this tile, I watched in real time as the tiles got dirtier and dirtier during the installation process. After installing, there were scuff marks marks on almost every tile that wouldn’t come off. You can see where some corners wouldn’t stick either.

Needless to say, I was not impressed with any part of these tiles or the install process. I feel duped because I’ve seen so many others recommend these. My expectations were higher.
Peel & Stick Floor Tile FAQ
Does Wallpop Peel and Stick Floor Tile look cheap?
Absolutely. They looked worn immediately out of the box, and by the time they were installed, they were even more marked up. They look like linoleum flooring, but cut into squares. Half-way through installation I discovered that the patterns were so inconsistent that I wasn’t getting a perfectly clean look between the tiles. The tile pattern is poor quality. Even after spending extra time trying to get them to line up, it was impossible to get exact. The tiles also don’t perfectly stick to the floor and the edges are popping up.
Do they feel cheap?
100%. It feels like linoleum flooring. There’s a slight texture to it so it has some grip, and it’s not too glossy.
How durable are they?
We’ve only had them installed for about 2 weeks now. I will keep you posted on how long they last! According to their website, they’re water resistant and can be installed in a bathroom. But considering the adhesive isn’t very strong between the tiles, I’m expecting water spills to affect how well the tile sticks in the future. So far, they seem to get scuffed and scratched easily.
What’s the cost to install?
I paid about $45 for 3 boxes of tiles. 30 tiles total for this small space. I used almost all of them because I made so many mistakes and had to redo some. You can also purchase floor primer on their website for about $17.
How easy are Wallpop peel and stick tiles to install?
This is not a beginner-friendly project. I have tiled a shower and two bathroom floors, and these peel & stick tiles were just as difficult, if not more so than the real thing! It took me four hours to install 25 tiles in our little bathroom. The finished look was not worth the effort. Because of the poor design quality, I couldn’t get the patterns to line up well. It took me extra time to configure the pattern in the best way. There are no grout lines, so the measurements and cuts need to be precise or you’ll end up seeing the flooring beneath it. Like below.

Cutting the tile itself was difficult with just an x-acto knife or box cutter. I am very particular about getting perfectly aligned and cut tiles, but these were so frustrating that I gave up and left lots of mistakes. If you’re installing these in an open space where you won’t need many special cuts, this will be easier for you.
WallPop Peel and Stick Floor Tiles Pro’s
Despite all this, there are a few things I like about them.
The tiles are also thicker than I expected. I used them over tile that still had grooved grout lines and are different shapes then the peel & stick floor tiles. I honestly can’t tell where the grout lines beneath it are. The flooring feels even.
If you’re like us and just need a quick transformation in a space with poor flooring already, these might be a good option.
Honest Review of Wallpop Peel and Stick Floor Tiles
Unfortunately, I would not recommend these to anyone. And I really wanted to like these! They look deceivingly cute online. But up close, they feel cheap, look cheap, and won’t last. Maybe I just had the wrong expectation.
Cons:
- Poor quality out of the box (already worn)
- Difficult to get precise cuts
- Inconsistent tile patterns from tile-to-tile
- Easily scuffed
- Feels like linoleum flooring
- Not worth the effort!
I’m more convinced than ever that it’s worth waiting to invest in real, quality materials for your home.

Have you used these before? Did you have a better experience? I need to know if it’s just me!


One Response
To get good accurate cut line .1st use art construction paper to draw and cut a very precise pattern and remember to draw trace the pattern on the tile and cut slowly with new scissors..Place tile glue on cleaned floor let it get tacky for 15 minutes.Then place tile carefully following lines. Take your Time….