Today I’m sharing about a slipping sill plate we discovered this week on our leaning foundation. What is a wall sill plate, why it’s important to your home’s structure, what happens when it’s broken, and how to repair it.

We got more bad news about our hidden foundation issue this week. My dad is an engineer and did some digging for us for our upcoming foundation repair. He discovered a deeper issue with our leaning foundation that requires an additional fix! An overhanging, broken, wall sill plate.
Just learned you need a foundation repair on your home? I’ve been there. Head to my Foundation Repair Survival Guide for Homeowners first! It’s an incredible resource on who to call first, what expect, and how to protect yourself, your home, and your finances in the process. Read now >>
Fixing A Broken Wall Sill Plate
We’ve been told by two foundation companies our North basement wall has tilted inward about 2-3″. But my dad also discovered that the basement wall has moved inward enough that the wall sill plate sitting on top of it has broken. And is sliding off the foundation!

What is a Wall Sill Plate?
I didn’t know what a wall sill plate was before we bought this house, so let me break it down for you.


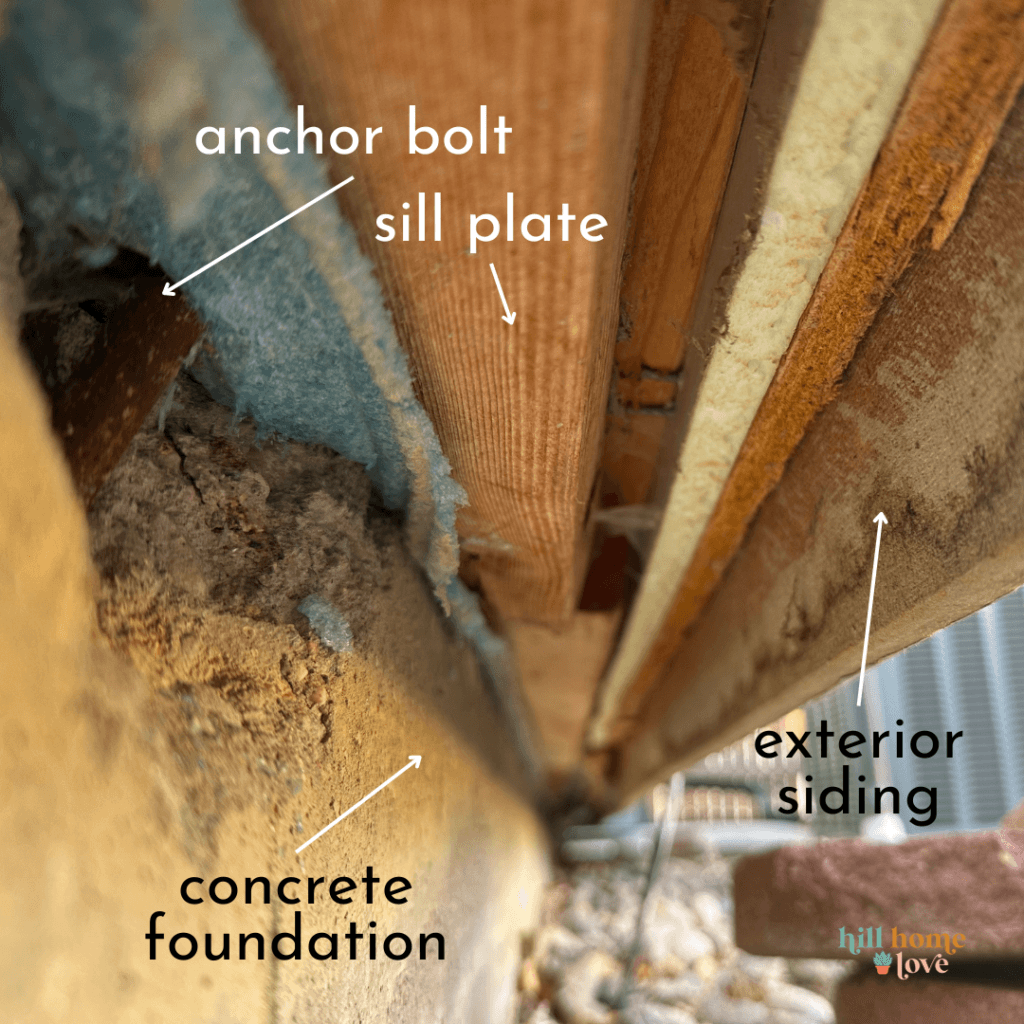
A wall sill plate is a flat, horizontal board that sits on top of your foundation, and below your first floor. (There are different types, but this is normal for a 90’s home like ours.)
It gets bolted into your foundation, and the floor joists and vertical wall framing get secured into the top of this board.
It’s a critical part of your home’s structure. The sill plate anchors the wall above into the foundation below to keep it from moving.

Typically, a sill plate that sits on top of your foundation is a 2×6 board.
So since our basement wall has moved inward 2-3″, we should still have about 3″ of the sill plate left on top of the foundation to support the wall sitting on top of it.
That’s what two companies assumed when they evaluated our foundation repair.
What happens if the wall sill plate is broken?
However, my dad discovered that our home’s builders used two 2×4’s on top of our foundation instead. So the outer 2×4 board, which the upper wall is secured into, has slid 3″ off the foundation, leaving only 1″ left!
Unfortunately, the remaining 1″ of this outer board is what’s holding much of the weight of the wall above it. Which isn’t nearly enough support. This overhanging wall sill plate board has now split, cracked, and separated in some places along this wall.


In this process, the bolts that should be anchoring the sill plate (and the whole structure above) to the foundation have broken off in four places.
Meaning, the wall is disconnecting from the foundation.
Over time the weight of the wall above will continue to push down onto what’s left of this sill plate (1″). Eventually this could cause the wall and the floor above it to crack, sink, or fall. Meanwhile, stressing the rest of our home’s structure too.
I’m shocked we haven’t seen any settlement cracks on the interior yet!


How do you fix a broken wall sill plate on a moved foundation?
The good news is, this isn’t an uncommon issue with foundation movement like ours.
A broken wall sill plate just changes the type of repair we need. And makes it more of an invasive and expensive repair than we originally planned.
Luckily we still have a few weeks before this scheduled repair, so I called our foundation company to talk through our options. They gave us two solutions:
Option 1: Straightening The Foundation Wall
The original plan was to leave the wall at a lean. The wall anchors we planned to install to brace the foundation wall would permanently prevent any further foundation movement. Straightening the wall would have been more for aesthetics than anything else.
However, straightening this wall has become a necessity. This would allow us to properly reset the sill plate on top of the foundation wall again, and ensure lots of support for the long-term health of our home.
Our foundation repair company said this is the ideal repair for an issue like this.

We would need to remove our backyard deck and concrete patio, and excavate 3 feet along the entire back wall, all the way down to the bottom of the foundation.
Next, they would raise our house with hydraulic lifts. Then they would straighten the foundation wall, then lower the house back on top of it, and reattach the wall sill plate properly.
Lastly, they’d add the wall anchors to keep the basement foundation wall stable, as originally planned.
The cost for this option is $8,000 on top of the $13,000 for the wall anchors: $21,000 total.
Plus we’d lose our deck and patio, which we’d want to replace as quickly as possible. We use them all the time. Our deck is in poor shape, and while we’re planning to replace it, we were hoping to push that project to next Spring. This would drastically move up our timeline.
They did offer a second solution.
Option 2: Adding A Steel Angle Beam
This option is cheaper and less invasive, while accomplishing the same goal.

A steel beam gets anchored to the outside of the foundation to create a “shelf” for the wall sill plate to sit on. This gets secured into the existing foundation in sections underneath the siding, following the curve of the wall.
No excavating, house lifting, or patio/deck removal needed. We’d need to remove a few top boards from the deck to provide access to that part of the foundation wall, but the repair company could work around the open deck framing to complete this project.
I’ve been assured this angle beam option is as safe and structural sound as straightening the wall. I’m still waiting to hear if our foundation company will offer the same lifetime guarantee for this portion of the repair.
It really comes down to how much money we want to spend and which option we prefer.
This option costs $4,000, on top of the $13,000 for the wall anchors: $17,000 total.
Next Steps and Foundation Repair Timeline
We’re currently in the queue for this foundation repair to happen in early December. So we have some time to decide how to move forward. Thankfully this snag won’t affect the construction timeline.
I’d prefer to straighten the wall and have peace of mind that everything is in it’s proper place. But our budget is already stretched with this major unexpected expensive.

Dealing With Additional Costs In a Fixer Upper
Obviously, this isn’t fun news. Especially since this is already an unexpected, expensive repair we didn’t know about when we bought our home in June.
We have a normal budget just like you, and this cost is too high to pay out of pocket right now with just moving and doing lots of other repairs we didn’t anticipate. It means we need to readjust our plans and expectations for the next few years as we work to pay this off.
We had big dreams of finishing this basement as soon as possible. I think we’re both sad to see that project get pushed back even further as the cost for this repair grows.
There are some aspects of this repair we could do ourselves to save on cost. But we don’t have the bandwidth for this project. I’m happy to pay someone who’s license and insured! And offers a lifetime, transferrable guarantee of the work, should we ever have future issues or decide to sell our home. This is not a DIY we’re interested in, at all.
Homeownership, am I right?
I know you have encountered unexpected repairs as a homeowner, too. Or if you haven’t, you might encounter it in the future.
I hope sharing our story with this unexpected, expensive project encourages you that you’re not alone.
If you’re like me and you research before committing to home repair decisions, it can be hard to find information you need. How do you know the quote you received wasn’t overpriced? Or that the repair suggestions will work?
Which is why I want to share our story here. Hopefully you’ll never find yourself in a similar situation to ours, but just in case these details are relevant to you, I want to help.
We love our home and want it to be structural sound for years to come. We can see ourselves living here long-term and we want to repair our foundation the right way, as much we’re able to.
This means big remodeling projects can wait – even though that’s not what I want.
We’re just grateful to have a home where our family is thriving.
Nathan and I have lots to think about, and I’ll be sure to keep you posted what we decide to do for this project!
UPDATE: Our sill plate and leaning foundation are fixed!!
Read More >>


2 Responses
Those pictures of the exterior wall/sill plate sliding off the foundation look EXACTLY like mine! Only difference is ours is sliding off AFTER we had a foundation lift (17 push piers/3 wall anchors) about
4-5 yrs ago? My question is did you go with the lift/replace foundation wall or the 2nd option of “angle iron/shelf repair”? Our whole story dealing with the so called “foundation experts” (CLS Concrete Leveling Solutions Omaha, now Groundworks Omaha) was a complete nightmare! $42k later and we come out of winter to this glorious situation i discovered while planning landscaping. We too have ZERO signs from the interior and heres the even better part! The basement remodel is completed and its not just a “normal remodel”? I built my dream music studio, a seperate theater room, an arcade, all having built in sound systems integrated into the walls/ceiling with many other bells and whistles and of course a extra bedroo/bathroom/laundry room. The remodel only cost about $1,000 because i had everything on hand leftover from other jobs I’ve done over the yrs flipping houses, going to auctions and buying when things were on sale/discontinued? I’m sick to my stomach now because of all we’ve already been through and we don’t have the finances to hire anyone because we’re starting over from scratch financially now having depleted our savings from the original foundation repairs ordeal from 5 yrs ago? We’ve not been able to recover and Its made our once comfortable financial living situation into a “our we going to be able to pay the electric bill” nightmare! Idk what I’m going to do forsure but i have the skills, willingness, materials and tools to do the repair? its just finding people like you (us) who have had this same experience and how it was rectified? I would definitely appreciate any insight/knowledge/pix/videos you may have from your repair so it may help witb ours?
Thank you!
I’m so sorry you’re going through this!! I totally understand how frustrating and disheartening that is. Did the company who did the original repair offer any kind of guarantee? If you’re having issues, I would definitely ask them to fix it!! It might be covered under their warranty or guarantee!