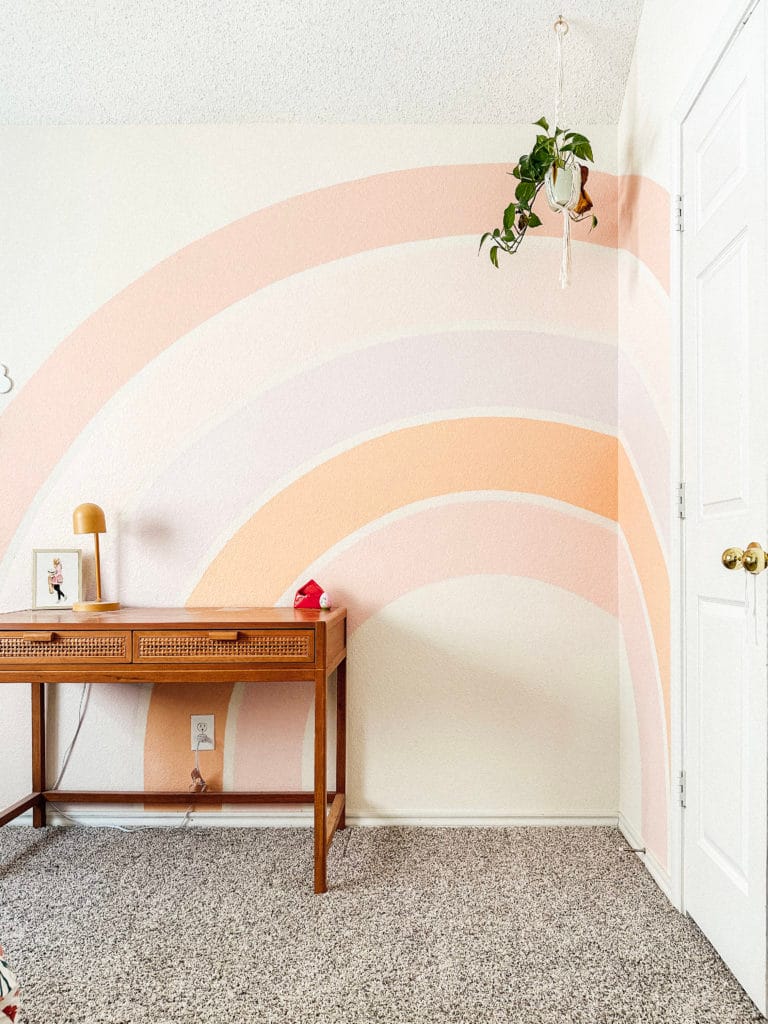
My little girls are all about pinks, purples, and rainbows, so after years of living in a beige and brown rental, I knew I had to do something special in their new room. I decided to DIY a fun rainbow mural to surprise them, and it turned out to be the perfect touch. Plus, it was easier to make than I expected!

Tools & Materials Needed
TOOLS
MATERIALS
- Painter’s Tape
- Cotton String – or any kind that doesn’t stretch
- 5 Paint Colors of Choice

How To Paint A DIY Rainbow Mural
Step 1. Find The Center Of the Rainbow Arch
I decided how big I wanted the top arch (the largest one) to be first. Then I found the center of this measurement using my tape measure. Using a small piece of painter’s tape, I marked this center measurement.

Step 2. Trace The Arches With A String And Pencil
Next, I used a push pin and a piece of string at the bottom of the wall in the center of the arch to trace out each individual arch shape with a pencil. It took me a few tries to get the motion of it down so the arch looked right.
Starting with the top arch, I traced each arch about 14″ wide. Once I finished one arch, I shortened the string and created the next arch, keeping the width about 14″ wide. I’m not a math person (*high five*) so this took some trial and error to figure out how much of the string to shorten. I adjusted the pin and string up and down as needed too.

Want to know a designer secret? Get my insider tips on how to order the right size rug every single time.
To continue the arch over the corner and to the next wall, I added another pin and string in the center of this part of the arch. As if you are creating a second arch. Then I lightly traced the arch shape, continuing from where it landed in the corner on the left. I didn’t stress too much about getting this part exactly perfect.
After I traced each arch, I took a step back to make sure it looked even and like an arch. It turned out great!
See a few pictures down there’s a 4″ piece of tape right where I secured the push pin and string to create the arch shape!

Step 3. Add Painter’s Tape Over Stenciled Rainbow Mural Template
Then, I went over each pencil tracing with 1″ painter’s tape. Keeping each arch 14″ wide as much as possible, I used short pieces of tape to create the arch shape.
Step 4. Lightly Paint Over The Tape With The Wall Color
Next, I went over the tape with the creamy white color of the walls to seal the tape down and get an even cleaner paint line. You can see in the picture below there’s a layer of white paint on the top and bottom edges of the painter’s tape.
This creates a seal over the tape and helps you get a cleaner paint edge when you have textured walls.

Step 5. Paint The Rainbow Arches
This is the fun part! Add 1-2 coats of paint into each color arch to create the rainbow mural. I switched between painting with a 6″ paint roller and a paint brush, but ended up just using a paint brush for most of it. It’s a small area so I could paint it quickly. This soft paint brush is my favorite go-to for all paint projects.
I got a quart-size can for each color. Some of these colors were recommended from A Beautiful Mess but I swapped out a few to match our decor. These are all by Valspar Paint.
Paint Colors from Top To Bottom:
- Crystal Coral
- Pink Wink
- Opal Blush
- Peach Encounter
- Baby Blush
Step 6. Remove Painter’s Tape While Rainbow Mural Dries
While the last paint coat is still a bit wet, carefully remove the painters tape. I like to do this before the paint fully dries because it doesn’t peel as much.

This turned out to be such an easy, beginner-friendly paint project. I love doing a big paint statement like this because it eliminates the need for lots of decor in this small space. This would be a great renter-friendly project too!
Plus, seeing your kids sleeping or playing under a rainbow is what dreams are made of. It brings so much joy to our home!
Keep reading >>