I was named an expert in a Rent. article! Read the full article here: 20 Gallery Wall Ideas: Expert Examples and Tips for Inspiration.
Rent. is a subsidiary of Redfin.com
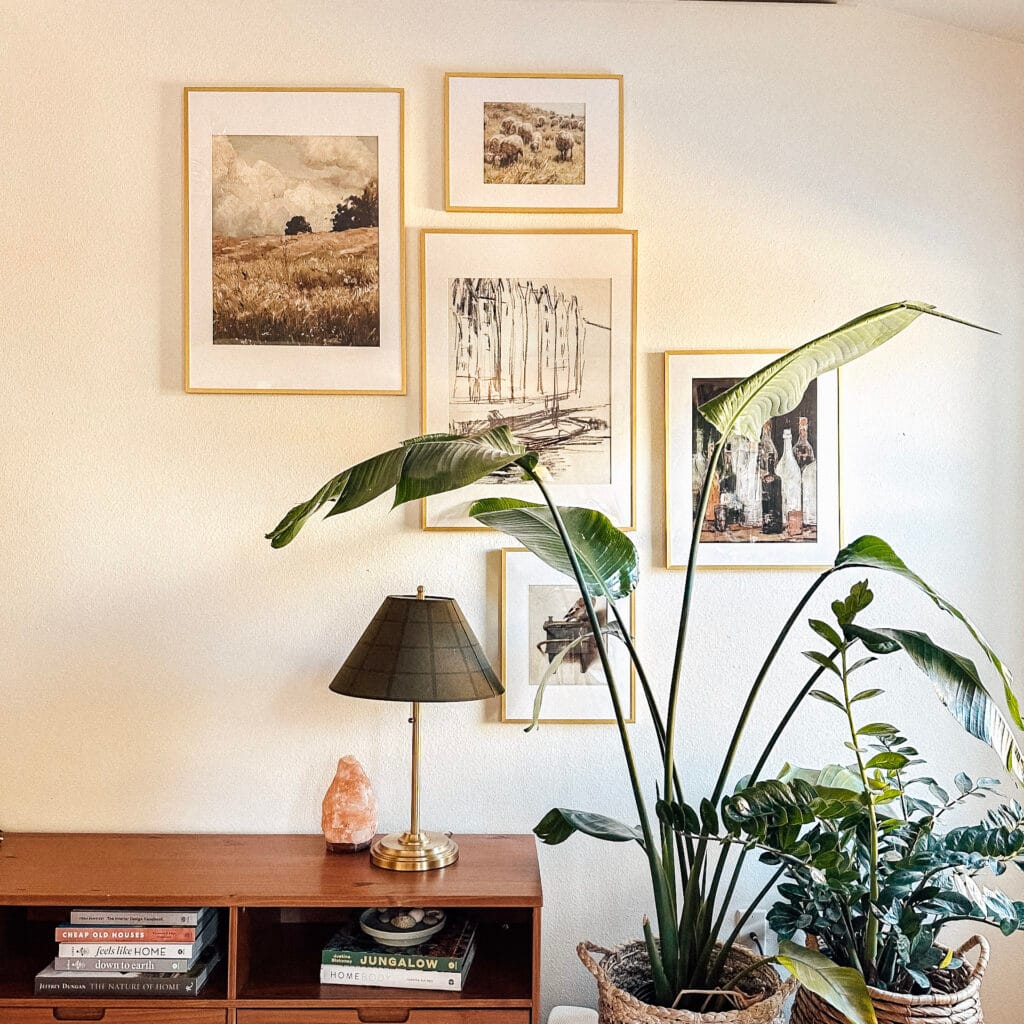
Today I’m sharing how I assembled a DIY Public Domain Artwork Gallery Wall at our house using free art. Get links to budget-friendly frames, tips on how to map your art placement, where to find free public domain art, and more below.

What is Public Domain Artwork?
Public Domain art is artwork that has been released from copyright. You can download it, print it, change it, sell it. It’s unlicensed, which means you can use it however you like. There are millions of public domain artwork pieces out there! Some old, some new.
Think of websites like Unsplash or Stockphoto. Many of their photos are free to download as use however you want because they’ve been released from copyright and submitted into the public domain.
Public domain artwork also includes vintage art in many design styles. Portraits, landscapes, seasonal scapes, holiday, still life, drawings, contemporary, watercolors, photographs, and more.
Using public domain artwork in your home is a budget-friendly way to furnish your home without compromising on style.
Where can you find Public Domain Artwork?
A few years ago, I discovered Kadie’s Public Domain Print Shop and was welcomed into the world of historic, free art. I browsed through her print shop and started saving pieces I loved in a Pinterest board here. I also searched through websites like…
Etsy stores like NorthPrints sell public domain artwork for very cheap. This is a great option because they’ve done the work of scouring for prints, and made them easy to download and print. NorthPrints will send you dropbox files with the correct resolutions according to the size you’re trying to print. I chose this option for a few of my gallery wall prints.
Why use public domain artwork?
It’s free, high quality art that adds character to your home. I was shocked to discover how much free art is out there. I’ve even seen big box art companies repurpose public domain art to sell at a high end price.

Selecting Frames For a Gallery Wall
I admit, gallery walls are intimidating. One push back I hear from followers and clients is how impossible it feels to start them.
“Do you buy matching frames or is variety okay? What art works best?”
The truth is there are lots of ways to approach a gallery wall. I’ve seen gorgeous, maximalist style ones with mismatched frames and art pieces. And I’ve seen sleek, modern ones with matching frames.
Use Pinterest to narrow down what style gallery wall you like. Then, start collecting your frames.
To make the process easy, I started by ordering various sizing of matching frames. I used these simple, gold IKEA frames+. I love the white matting, and they were really budget-friendly.
I’m a visual person, so I played around with the spacing and frame sizes on the floor until I found a layout that felt right.
Planning A Gallery Wall Layout With Canva.com
Next, I mapped out my prints. I opened a new Canva project, screen shot the frames I had ordered, and recreated my frame placement plan. I kept each frame size labeled so I wouldn’t lose track. Once I had my digital layout plan, I started to look for public domain artwork to go in the frames.
Pick an art genre.
Next, choose a general style or genre of art you like (photographs, vintage, sketches, abstract, contemporary, etc.). You can mix and match some, but try not to jump formats too much. I stuck entirely to vintage art.
Stick to a color theme.
I wanted similar color tones and a general theme for my gallery wall. Before choosing prints, I considered my house’s color theme. I wanted this public domain artwork to coordinate with the rest of my home’s furnishings and decor. So I stuck with colors that would compliment, which tend to be ones I naturally gravitate towards: greens, golds, blues, tans, and blacks.
(I shared how I picked 18 different colors in our small home here!)
Choose 1-5 subject themes.
After you have your color theme, pick a few subject themes. As you can see below, I stuck to landscapes, botanicals, birds, and houses. I tried to pick 1-3 pieces within each category, and spread them around within the gallery wall. This gives some repetition to the design and makes it feel cohesive instead of scattered or random.
Choosing a few subject themes is helpful for searching too, as most websites let you search by term or with a filter.

Searching with a genre, color theme, and subject theme in mind gave me a the right amount of guidance to select artwork that felt peaceful and that I knew I’d love to see everyday.
Once I had my prints picked out, I downloaded the files. I’m doing this gallery in phases, so I ordered the first 5 prints on my layout map.
My Prints:
How To Print Digital Vintage Art
Some original works were created on small canvases, and then digitized to be shared publicly online. If you try to stretch the image larger than the original artwork, you may end up with poor resolution. Meaning, pixels will show in the final print.
Check the Resolution and File Size
To get a clear, crisp, quality print you need to print each piece within the resolution allowance. Check the download file size and refer to this guide that tells you what pixel to print size ratio works best! I had to rearrange some of my gallery wall prints to ensure they’d print at a high quality.
Choose A Quality Printer
My photographer brother-in-law recommended Prodpi.com’s Giclée Fine Art Prints. I uploaded each artwork file individually, selected which size I wanted to fit within the frame matting, and then added it to cart. Once I had all my prints in my cart, I triple checked all the sizes and resolution details, and then placed the order.

I was truly surprised by the quality of prints from Prodpi! They emailed me to say their shipping times were a little slower because of a high order volume, but they didn’t miss a beat. My order printed and shipped within a few days, and arrived safely packaged at my house.
They carefully secured each print in a protected sleeve and layered cardboard sheets between each to prevent bending. The print paper felt really high quality and fit perfectly in my frames.
Once I had all my prints in hand, I added them to my Ikea frames. I secured each print with a piece of tape on the back of the frame mat, to make sure it wouldn’t slip down in the frame.
Installing the Public Domain Artwork Gallery Wall
Next, I started installing the frames on the wall. Keeping my general layout in mind, I started hanging the frames moving right to left. I held up each frame to eyeball an equal distance between all the edges. Once I had it, I marked the nail hole with a pencil, hammered in the nail, and hung the frame.
I placed larger frames in the middle, and smaller frames to the side, top, or bottom edges.
I can’t wait to add the rest! We have lots of other projects going on at the Peppermint House right now that are taking up our project budget. But it’s so nice to get at least a few of these up on the wall. I’m keeping track of the install progress on my Canva doc like this.

More Gallery Wall Tips
Keep it Simple.
First and foremost, don’t make it more complicated than it needs to be! I’ve recommended a gallery wall to design clients before and watched their eyes round in intimidation at the thought of trying to assemble this on their own. And I get it!
There are lots of details to choose in this process.
How far apart do you space the frames? How high/low should you layout the frames together? Is it okay if only some of the frames are matted? Should all the frames match? Where do I find art to put in the frames?
The less friction you can introduce into the process, the better!
- Get inspired from Pinterest. (I made a board for you here.)
- Choose your frame style
- Create a placement layout
- Choose art you love
- Try not to overthink it!
For me, this meant using matching frames with clearly labeled dimensions for printing sizes. I made sure the spacing between the frames was generally equal, but not too rigid to keep it looking a little more organic.
Pick art that makes you happy.
As for what art to choose, my husband and I are in different camps.
He loves family photos, but I prefer more artsy prints. I like adding small family photos scattered around within our decor, but I don’t like big pictures of us on the wall.
Spicy take, but I don’t want to stare at myself all day! And I already see my family’s faces all day, every day. It just feels odd to me. But that’s just me. I’ve come to realize that having family photos around the house makes it feel more like home, and I can do a better job incorporating those. Something for me to work on as we put together our home.
I chose public domain art for this project because my heart loves vintage. I grew up in a 100 year old victorian home in Wisconsin, and I dream of owning a historic home one day. But, we landed in a 90’s home with very little character because it fits us best right now. It’s my goal to add in architectural details over time as much as we can.
For now, one easy way to add character in the mean time is through decor. Art is a great way to define a space. So choosing vintage art was a no-brainer for me.
It makes me think, it makes me happy, and it has a history to it. Win, win, win.
Nothing is permanent.
Another reason for choosing public domain artwork is because it’s easily changeable. The only cost involved is printing.
It’s not a big investment, and I love that I can swap in art with the changing seasons or if I get tired of one of them. I can pick a different piece, print it, and swap it into the frame.
This means less pressure to pick the exact right pieces. Pick what you like, change it later if you don’t like it.

DIY Public Domain Artwork Gallery Wall Phase 2
Phase 1 of the gallery wall is complete! The next phases will be much easier now that I have a plan already in motion.


